Wednesday, June 30, 2010

Chelsea Nash-Step book

Step Book:
This is pretty much just directions to make the text block.....The covering can be whatever you wish it to be.

1. For the signatures you can use anywhere from 3 to about 5 pages depending on how long you want your book to be. Its easier to use vertically long paper than horizontally long paper. Line up your papers how ever you wish and it's easiest to mark the measurements so it all even.
2. Fold paper over from the side with no tabs to touch the other side. Make sure you leave the even amount of space on all the tabs. You need to make sure the tabs are all the same size when you fold over. You just need to eye it and keep folding it over slightly, but not all the way to get all the tab measurements the same.
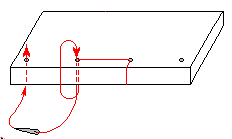
3. The you can make as many signatures as you would like. The I did a Japanese stitch for this book. So I punched five holes in the signatures and then sewed the signature. Then I aligned the paper with my book board. I left 1/8" on the tail, head, and edge.

4. Sew the text block to your book board

By Carol Rhees

I did a combination between a flag/accordian and a piano hinge book. The steps are pretty easy!

Basic Book:
1) Cover your two ends of book board
2) Take a longer piece of paper that is the same height as your text block and fold it back and forth like and accordian or fan.
3) I would recommend gluing your pages in first so that you know the width that your text block is going to be before you do the binding. You can glue them in after doing the rest of the book but you risk the covers springing back.
4) Glue in text block to the front and back cover. Make sure that the text block lines up nicely with the edge of the board.

Binding:
1) You can use book cloth or leather. Cut out a good amount of your binding material (book cloth or leather) at least three inches wide. I cut out more just because then you are sure that you can make your binding wide enough for your text block.
2) Draw an inch on both ends (or however much you want to be on the covers) and at least 1/2 inch from the head and tail.
3) Now you need to determine how many hinges you want in your binding. However much you want I would draw out the appropriate measurements. This might help:
4) There are specific flaps that help cover edges.


5) So each piece will look like this:
Part A

Part B

6) Glue the long #2s around a dowel or some kind of rod. Make sure not to glue it to the rod otherwise you will not be able to remove it later.

Hopefully it will turn out something like this or even better!

Tuesday, June 29, 2010

Japanese Side Stich


This is pretty awesome and easy to make! :)


**This is basically Stab binding with a slight variation.**


What you’ll need:


• Book board

• Heavy thread, eight times as long as the book's height

• Hole punch or awl

• Needle

• Ruler

• Pencil

• Binder clips


1. Cut desired amount of paper. Poke an uneven amount of holes on the side of the paper (not through the spine like usual).


2. After covering the book board and punching holes, now the fun begins.

3. Remember to keep the thread taut. Go down through the middle hole to other cover, wrap the thread around the spine and go back through the hole you started with. Continue doing this with the rest of the holes.

Sewing a Japanese book-figure 2.PNG

4. At the top and bottom of the covers wrap the thread around an additional time.

Sewing a Japanese book-figure 6.PNG

5. Tie a knot and trim the excess.


Ta-da! Now you have a fantastic book!


Posted by Kristi Gerhardt

Hanging Scroll - Emily Greenquist

You will need:
  • two wooden dowels of the same length
  • four wooden drawer pulls (to put at the end of the dowels)
  • paint
  • one long text paper
  • two end papers long enough to cover wrap around your text paper (2" or more)
  • ribbons
How it Rolls:
Start with your dowels. Glue the drawer pulls on the ends of your dowels and let dry. Once dry paint them your desired color and set aside to dry again. While those are drying you can prep you text block and end papers.
Though the length of either of the papers does not matter, the width of both should be the same. Measure about a half inch smaller then your dowels (be sure to measure the space after the drawer ends are on), leaving a quarter inch on both sides.
Glue a quarter inch seam of glue along one end of an end paper and affix one end of the text paper to it. Do the same to the other side, making both identical. Now you have one long paper.
Once your dowels are done drying put a strip of glue on one dowel. Center the end of your long paper on the dowel and affix it to the dowel. Then gently roll your dowel up your end paper until your dowel is completely covered with your end paper. With another strip of glue, glue the end paper in place on the dowel. Do the same to the other end of your scroll.
To add ribbon to your scroll and tie it together, choose one end of your scroll to be the outside part that you see. On your end paper cut two sets of two parallel slices the width of your ribbon about one inch in from your text block and either sides of your paper. Be sure that these cuts are also parallel to your dowel and text block. Weave your ribbon through the slats you cut from out side, to inside back to outside. This allows you to roll up your scroll from the opisite end of your ribbon and tie it all together.
To hand simply tie ribbon to the ends of the top side of your scroll's dowel.

Monday, June 28, 2010

Slit Tape Sewing - Rachel

Click on the images to make the instructions larger!


*******Birthday Wishlist Book*******

Honestly, this is the easiest book you could possibly ever make. For real. First you make a cover. For my book, I just made one hard cover but if you want two, GO FOR IT! :) I just made my cover out of book board and I covered it just like you would cover any other cover for any other book. Simple. Then I had to decide what kind of paper to use on the inside. I chose card stock. Partially because I bought so much of it but also because I have really began to love card stock. I really like the texture of it and it is very durable because its thicker than normal paper. Perfect for photo albums......or Birthday Wishlist Books! :) Then I chose a piece of decorative paper that I wanted as my cover. I could have made another cover but since I want mine to hang on my fridge I decided to do something that could bend. After I had chosen my paper and my cover, I lined up everything and marked where my holes would be in the back cover, paper, and front cover. Made the holes, and then tied it all together with a piece of yarn. You could sew the pages together if you really want to but it doesnt require it. After you have everything tied together you can now decorate the cover however you want.

Now, you have a Birthday Wishlist Book. As I mentioned earlier, I am going to hang mine on my fridge so that my mom can see exactly what I want for my birthday! So if you want to do the same, just glue a magnetic strip on the back of your book and youre good to go!

Have fun!

Wednesday, June 23, 2010

Flutter Book- Amber Fair


Japanese Flutter Book- (Posted by Amber Fair)

This one has already been described here. It is easy to figure out just by looking at pictures, but here are my instructions. It involves no sewing, and the pages are connected to each other by a thin strip of glue, which are then glued into the inside flaps of the cover.

Select your paper, (all must be same size) and fold each page in half.

Glue the fore edges of paper together using a thin strip of glue.

Cut out 4 pieces of book board, all the same size. They should be just slightly bigger (about 1/4th an inch on each side) than your paper sheets.

Take two of the pieces of book board and cut them slightly narrower than the other two. (how much you cut out depends on preference and the sizes of paper/book board you are using. I cut them 2 inches narrower on mine)

Take three pieces of book cloth and connect them, so you have 3 spines. The middle spine is wider than the two outside spines. The amount of space in between the book boards will vary depending on how much paper you used, and the thickness of the paper. Then cover it completely with paper like you would any other cover.

Last, glue the two outside fore edges into the inside of the two cover flaps, this is what holds your paper into the cover.

note: for a much easier cover, you can just take heavy paper and fold it.

Bradel Book

Instructions for the Bradel Book binding

Spine/ thin cover

Cut two pieces of thin board (chipboard or cardstock paper) exactly the same size.

They will be ½ inch longer (tall) than your text block, but 3/8 inch shorter (wide).

Spine is made out of the same material and will be the same height about a 1/2 inch wider than the spine of your text block (1/4 inch on both sides).

You will then glue the 3 pieces onto your spine cover (book cloth) leaving a ¼ inch in between for the hinge.

Outer cover

Book board should be cut into 2 pieces the same measurements as the cardstock pieces.

Covering- after you glue the main board onto the paper and are now starting on the left over sides (there should be about an inch of left over paper all around), glue down on the side that will be closest to the spine. All of the other 3 sides will be over lapped around both the book board and card stock, which will connect the pieces.